WebCenter Sites provides out-of-the-box utility to create an event which can regularly on the time set. To create an event which works as scheduler basically calls WebCenter Sites managed SiteEntry or Template via entering an entry in "SystemEvents" table in specific format.
When to use SystemEvents?
There can be various scenario to use system events such as:
1. Generating output of daily updates on the certain tables
2. Generating sitemap.xml
3. Call certain services such as creating assets from other systems
4. Call custom search like SOLR search
5. Call list of pages so that event works as crawler on delivery system. For e.g. on publish, pages are flushed, thus, pages are required to generated again. Thus, if those pages are calculated, then can be crawled with SystemEvents too.
There are 2 ways by which you can create SystemEvents: either via ContentServerExplorer/SitesExplorer or via programming
With SitesExplorer, it is very easy. You just need to add an entry within it manually with appropriate values and that's it. But certain clients don't allow access to SitesExplorer or CatalogMover and thus, it is difficult when such events are required. Hence, the need of a program which can create System Events whenever required as shown below:
Following SystemEventsUtility should provide an idea on how to create utility to perform all the tasks related to events: create, enable, disable and destroy.
Information related to the methods are present in Oracle WebCenter Sites Tag library.
Disclaimer: The code and/or the configurations posted are not official recommendations and should be used at sole's discretion with proper testing before deploying on live WebCenter Sites systems. Cheers!!
Thursday, November 10, 2016
Sunday, August 28, 2016
Generating page urls which reflects folder structure
In Oracle WebCenter Sites 11.1.1.8.0 and above, it is very easy to generate vanity urls with help of webroots. With introduction of Vanity URLs concept, editors have control over urls without help of developers once URL Pattern is set and thus, removing the need of developing/updating URL assembler for generating urls. Furthermore, editors have ability to create 301 and 302 redirects as well.
Admin/Developer's Guide details about setup of webroots and URL pattern with examples, hence, it is redundant to explain the same in this post.
Although, there is facility to generate desired short urls, there is one particular case which mostly every client wants to have i.e. to generate urls for page assets that reflects the pages placed in SitePlan tree (/locale/level-1-page/level-2-page/..).
For e.g. Consider FirstSiteII sample site, there are 4 home pages for all each language: en, fr, de, es and there are few pages placed under FSIIHome (en language version of pages), thus, any client will like to have url the following way:
FSIIHome --> /en/home
FSIIAbout --> /en/home/about-us
FSIIProducts --> /en/home/products
.....
Home (es) --> /es/home
Home (fr) --> /fr/home
Home (de) --> /de/home
As Editors keep on adding/editing and updating pages' position in SitePlan, it has become very necessary for clients that pages' URL update automatically. Also, editors mostly desire to decide their own url string, for e.g. for Home (fr), url string would be accueil, thus url should be --> /fr/accueil
Keeping in the mind above requirements, there are 3 easy ways (there can be other ways too) to achieve hierarchical urls for Page assets. First of all, it is very clear that editors want to enter their own url string (page url string which would be part of url); thus, create one attribute which would hold this url string value which editors can edit.
1. URL Assembler: It is widely used by various developers to generate page urls which reflects page path in SitePlan. As this post is about generate vanity urls without use of Assembler, it is out of scope of this post.
A simple idea would be to find page's path in one element and then pass this calculated path as argument to <render:gettemplateurl> tag with inclusion of assembler attribute which would be used to generate urls while assembling. Developer's Guide details on how to generate url assembler and is quite explanatory.
2. Flex Filter: Flex filter can be used for finding page's path and save the path in some custom attribute (say URLPath) so that this custom attribute can be used for defining Page's URL Pattern. Thus, while creating Page URL Pattern, pattern can be similar to following: ${locale}/${f:spaceToDash(URLPath.toLowerCase())}
Although, it is quite a flexible solution but if any changes are required, have to update and deploy flex filter which may not be desirable in few situations like restarting WebCenter Sites, saving all page assets, etc. Furthermore, I have experienced that updating URLPath attribute's value with page path doesn't always reflect immediately in page's vanity url. Sometimes, its required to edit & save page assets 2 times. I faced this issue in my local 11.1.1.8.0 JSK but may be latest patch includes the fix.
3. Custom Function: All the Functions which are available while defining vanity url pattern are present in OpenMarket/Xcelerate/Util/GetUrlExpressions element. You can update this element and add your own custom function as required and generate vanity url for assets. Please note, functions within this element do not support Asset API or REST API but it does allow use of ICS object. Thus, with this key information, we can use ICS object to call a CSElement which can generate url path string and then, use this calculated url path string to generate hierarchical urls for Pages.
For creating the custom function, just start by creating one CSElement with name: OpenMarket/Xcelerate/Util/GetUrlExpressions and click on Element Tab, automatically existing code should be visible as it should already exist in ElementCatalog. Include the following custom function which accepts id and locale as input and calls a CSElement. This CSElement is responsible for generating url path and set the url path in ics scope to be used by the custom function.
Sample code for finding URL Path (URLString is the page attribute where editors can input desired URL string for the page asset):
And, then just define page vanity url pattern using the above custom function. Add attribute: URLString to all page assets, update values in all Page assets and save. Vanity URLs should be present for all the page assets.
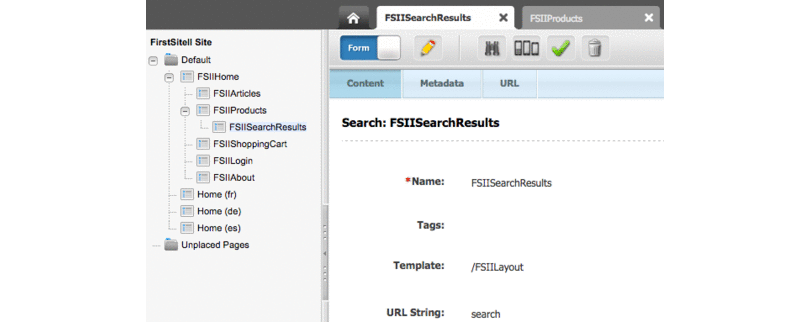
Following snapshots are for FirstSiteII Page URL Pattern as example:
Thus, by using custom function defined in GetUrlExpressions groovy element and CSElement, one can update business logic as many times required without restarting WebCenter Sites and deployment issues.
CAVEATS:
Admin/Developer's Guide details about setup of webroots and URL pattern with examples, hence, it is redundant to explain the same in this post.
Although, there is facility to generate desired short urls, there is one particular case which mostly every client wants to have i.e. to generate urls for page assets that reflects the pages placed in SitePlan tree (/locale/level-1-page/level-2-page/..).
For e.g. Consider FirstSiteII sample site, there are 4 home pages for all each language: en, fr, de, es and there are few pages placed under FSIIHome (en language version of pages), thus, any client will like to have url the following way:
FSIIHome --> /en/home
FSIIAbout --> /en/home/about-us
FSIIProducts --> /en/home/products
.....
Home (es) --> /es/home
Home (fr) --> /fr/home
Home (de) --> /de/home
As Editors keep on adding/editing and updating pages' position in SitePlan, it has become very necessary for clients that pages' URL update automatically. Also, editors mostly desire to decide their own url string, for e.g. for Home (fr), url string would be accueil, thus url should be --> /fr/accueil
Keeping in the mind above requirements, there are 3 easy ways (there can be other ways too) to achieve hierarchical urls for Page assets. First of all, it is very clear that editors want to enter their own url string (page url string which would be part of url); thus, create one attribute which would hold this url string value which editors can edit.
1. URL Assembler: It is widely used by various developers to generate page urls which reflects page path in SitePlan. As this post is about generate vanity urls without use of Assembler, it is out of scope of this post.
A simple idea would be to find page's path in one element and then pass this calculated path as argument to <render:gettemplateurl> tag with inclusion of assembler attribute which would be used to generate urls while assembling. Developer's Guide details on how to generate url assembler and is quite explanatory.
2. Flex Filter: Flex filter can be used for finding page's path and save the path in some custom attribute (say URLPath) so that this custom attribute can be used for defining Page's URL Pattern. Thus, while creating Page URL Pattern, pattern can be similar to following: ${locale}/${f:spaceToDash(URLPath.toLowerCase())}
Although, it is quite a flexible solution but if any changes are required, have to update and deploy flex filter which may not be desirable in few situations like restarting WebCenter Sites, saving all page assets, etc. Furthermore, I have experienced that updating URLPath attribute's value with page path doesn't always reflect immediately in page's vanity url. Sometimes, its required to edit & save page assets 2 times. I faced this issue in my local 11.1.1.8.0 JSK but may be latest patch includes the fix.
3. Custom Function: All the Functions which are available while defining vanity url pattern are present in OpenMarket/Xcelerate/Util/GetUrlExpressions element. You can update this element and add your own custom function as required and generate vanity url for assets. Please note, functions within this element do not support Asset API or REST API but it does allow use of ICS object. Thus, with this key information, we can use ICS object to call a CSElement which can generate url path string and then, use this calculated url path string to generate hierarchical urls for Pages.
For creating the custom function, just start by creating one CSElement with name: OpenMarket/Xcelerate/Util/GetUrlExpressions and click on Element Tab, automatically existing code should be visible as it should already exist in ElementCatalog. Include the following custom function which accepts id and locale as input and calls a CSElement. This CSElement is responsible for generating url path and set the url path in ics scope to be used by the custom function.
Sample code for finding URL Path (URLString is the page attribute where editors can input desired URL string for the page asset):
And, then just define page vanity url pattern using the above custom function. Add attribute: URLString to all page assets, update values in all Page assets and save. Vanity URLs should be present for all the page assets.
Following snapshots are for FirstSiteII Page URL Pattern as example:
 |
| FSIIPageURLPattern |
 |
| FSII Page Vanity URLs |
Thus, by using custom function defined in GetUrlExpressions groovy element and CSElement, one can update business logic as many times required without restarting WebCenter Sites and deployment issues.
CAVEATS:
- There is no escape from editing and saving children page assets when URLString attribute's value is updated in parent page. For e.g. updating FSIIHome's URLString attribute value from home to fsii-home does updates the vanity url for FSIIHome page from /en/home to /en/fsii-home but does NOT updates the children page's vanity url for e.g for FSIIAbout vanity url from /en/home/about-us to /en/fsii-home/about-us. All the children pages are required to be edited & saved for updating vanity urls. This is where URL Assembler can be helpful if there are many URLString attribute value changes but considering that most companies are very strict about SEO and google page ranking, page urls will not be changed frequently. Also, one can plan to generate vanity urls for Page assets when there is release, thus, it would be only one time edit & save for generating vanity urls for Page assets. Finally, it all falls to business decision.
- During upgrade or applying patch, one needs to take care that GetUrlExpressions element has your custom function otherwise you many loose all the vanity url for pages and have to generate again.
Sunday, May 1, 2016
Searching Assets in Contributor UI
In Oracle WebCenter Sites, searching assets in Contributor UI is very easy. Simply login, navigate to Contributor UI, enter search term and click on search will list the assets in list mode.
Whenever WCS is installed, global search is already enabled for indexing all available asset types (global indexes may be disabled on WCS delivery installation). Hence, whatever search term is included in Search, assets are returned from fields which are indexed as global indexing (Check here for list of fields which are indexed for global search). This is Simple Search. For e.g. if you search asset by id, then the asset with exact id match and referenced & associated assets are also returned; which may not useful as you want to search asset of a particular id only. Thus, one has to use Advanced Search; wherein inputing id in the Id column will yield only a particular asset search. Details of using Simple Search and Advanced Search is well explained in User Guide, thus, bragging about it in this blog post is useless.
What I mainly want to focus is that how one can optimize the use of search for not only Contributor UI users but for coding your search web pages too.
Optimizing search for Contributor UI users
Most of you might already know this; but still I think it is better to mention this topic - Saved Search.
Saved Searches are best way to search assets and participate in contribution activities for authors and publishers. In my past projects, I have seen admin/developers not mentioning this simple yet powerful utility to Contributor users which is present out-of-the-box for use. Saved searches can be used for various following purposes:
Creating private list of searched assets with following criteria
Moving on, following topics are more useful for developers rather than Contributors and are also very useful when it comes to developing search parts of web pages using: Query assets and Content Query assets.
Query assets can be used for searching assets of only one type but its most powerful usage is that one can include any SQL statement to search assets. For e.g. Search AVIArticle articles whose parentid = [ArticleCategory: Baseball articles asset id] simply including the following query can be useful:
SELECT id from AVIArticle, ArticleCategory_Group where AVIArticle.id=ArticleCategory_Group.childid and ArticleCategory_Group.parentid=1327351718484
Furthermore, more complex queries can used for searching assets; just need to take care that "id" column is return in resultset. Query assets are useful when associated to assets via association but can also be useful in Contributor UI if previewed using a template which can lists down the assets found from Query assets.
Content Query assets are used while creating dynamic recommendation. Dynamic Recommendations can use CSElement to search assets but can also use Content Query assets to search assets. Moreover, Content Query provides more flexibility and freedom to Contributor UI users to decide search criteria whereas when assets are searched using CSElement, developers have to update code to meet the flexible search criteria. For e.g. Consider that a website shows 5 latest news on homepage like a ticker display every week or so; contributor users usually create news asset(s) and publish. Normally, developers develop template such that the template which renders news ticker display will fetch by searching against the latest news based on business search criteria and display news. If now, only 3 latest news of a different criteria is required to be shown, developers need to re-code to fulfill these new flexible requirement if the news assets were searched using either dynamic recommendation (via CSElement) or directly being searched in ticker display template. In such scenario, contributors after creating news asset request developers each time whenever different criteria of news are to be shown. But if dynamic recommendation with Content Query asset is used; it will be very easy for Contributor UI users to just edit the Content Query asset according to their criteria and publish the Content Query asset, thus, no need for interaction with developers and ease the process for all.
Disclaimer: The code and/or the configurations posted are not official recommendations and should be used at sole's discretion with proper testing before deploying on live WebCenter Sites systems. Cheers!!
Whenever WCS is installed, global search is already enabled for indexing all available asset types (global indexes may be disabled on WCS delivery installation). Hence, whatever search term is included in Search, assets are returned from fields which are indexed as global indexing (Check here for list of fields which are indexed for global search). This is Simple Search. For e.g. if you search asset by id, then the asset with exact id match and referenced & associated assets are also returned; which may not useful as you want to search asset of a particular id only. Thus, one has to use Advanced Search; wherein inputing id in the Id column will yield only a particular asset search. Details of using Simple Search and Advanced Search is well explained in User Guide, thus, bragging about it in this blog post is useless.
What I mainly want to focus is that how one can optimize the use of search for not only Contributor UI users but for coding your search web pages too.
Optimizing search for Contributor UI users
Most of you might already know this; but still I think it is better to mention this topic - Saved Search.
Saved Searches are best way to search assets and participate in contribution activities for authors and publishers. In my past projects, I have seen admin/developers not mentioning this simple yet powerful utility to Contributor users which is present out-of-the-box for use. Saved searches can be used for various following purposes:
Creating private list of searched assets with following criteria
- Assets created/edited user X
- Tags (If a certain task is to be completed by an user; while creating/editing assets, user can simple add one tag within tags attribute and then search assets by tag and save search for future use)
- Locale
- Modified date (Custom Range is very useful in certain scenarios)
- Asset Type + SubType + Attribute Search (Note: for flex attribute search, asset type and corresponding attribute should be selected for indexing. This is very helpful when assets of particular parent are to be searched)
- One simple use case is to search assets by locale of a particular asset type. It is very easy to search assets by locale for a particular asset type but it is not very easy for other users who don't use advanced search functionality and thus, it becomes difficult for users to search assets by a particular locale. Thus, sharing this simple locale based saved search can be helpful to other contributors.
- Shared vs Unshared assets: Consider a global site containing assets, created with dimension - en_Global(Global English) and other site (Germany) which has assets created with 2 different dimensions: en_DE (English) and de_DE(German). Also, assets of en_Global can be shared to and used by Germany site for associations. Most common ask of customers is how to distinguish which assets are shared assets (meaning global English assets) and which assets are local assets (local English assets of Germany site). Thus, searching assets by both locales (en_Global and en_DE) in Contributor UI, saving them as save search and sharing across all contributor UI users can be very helpful; which can ease the process of contribution activity.
Moving on, following topics are more useful for developers rather than Contributors and are also very useful when it comes to developing search parts of web pages using: Query assets and Content Query assets.
Query assets can be used for searching assets of only one type but its most powerful usage is that one can include any SQL statement to search assets. For e.g. Search AVIArticle articles whose parentid = [ArticleCategory: Baseball articles asset id] simply including the following query can be useful:
SELECT id from AVIArticle, ArticleCategory_Group where AVIArticle.id=ArticleCategory_Group.childid and ArticleCategory_Group.parentid=1327351718484
Furthermore, more complex queries can used for searching assets; just need to take care that "id" column is return in resultset. Query assets are useful when associated to assets via association but can also be useful in Contributor UI if previewed using a template which can lists down the assets found from Query assets.
Content Query assets are used while creating dynamic recommendation. Dynamic Recommendations can use CSElement to search assets but can also use Content Query assets to search assets. Moreover, Content Query provides more flexibility and freedom to Contributor UI users to decide search criteria whereas when assets are searched using CSElement, developers have to update code to meet the flexible search criteria. For e.g. Consider that a website shows 5 latest news on homepage like a ticker display every week or so; contributor users usually create news asset(s) and publish. Normally, developers develop template such that the template which renders news ticker display will fetch by searching against the latest news based on business search criteria and display news. If now, only 3 latest news of a different criteria is required to be shown, developers need to re-code to fulfill these new flexible requirement if the news assets were searched using either dynamic recommendation (via CSElement) or directly being searched in ticker display template. In such scenario, contributors after creating news asset request developers each time whenever different criteria of news are to be shown. But if dynamic recommendation with Content Query asset is used; it will be very easy for Contributor UI users to just edit the Content Query asset according to their criteria and publish the Content Query asset, thus, no need for interaction with developers and ease the process for all.
Disclaimer: The code and/or the configurations posted are not official recommendations and should be used at sole's discretion with proper testing before deploying on live WebCenter Sites systems. Cheers!!
Saturday, April 23, 2016
Automatic Approval vs Multi-Destination Publishing
After the introduction of WebCenter Sites 11g8 version, Sites provides various improvements from creation of vanity url to proxy-assets to various customization hooks. One of the new customization hook introduced was - RealTime Publishing Customization Hooks which describes on how one can develop a custom solution for multi-destination/multi-target destination publishing. Although official guide provides full detail, I recommend to read this article once.
Thus, there is already an custom solution to:
1. Publish assets simultaneously to multiple destination. Furthermore, publishing to disaster recovery server can also be included.
2. Publish audit trails: Who published what and when
3. Minimize the effort of Contributors and Publishers
In one of my previous blog post - Automatic Approval of assets, I provided a glimpse on how to create a simple custom solution to automatically approve assets wherein administrators have control over setting up time when approval of content should occur which is similar as configuring scheduling publishing. With this approach:
1. Content is approved automatically to targeted destination
2. Admin has choice of selecting which content type (asset type) should be approved
3. Scheduling configuration just like scheduled publishing
4. If proper solution is developed, wherein administrators can easily disable/enable System Events, update asset types required for approval, destinations, scheduling, etc; automatic approval of assets can be helpful in various scenarios.
So, now which one to choose? Automatic approval or Multi-Target Publishing?
I have listed down few points which can help in deciding which mechanism will meet your requirements.
So there you have it, all pros and cons of both mechanisms. There is no preferred or superior option to other. One has to weigh both the options according to cache configurations, architecture and of course, customer requirements. Furthermore, both mechanisms can be mixed and used as needed. For e.g. Multi Realtime publishing can be configured for delivery servers whereas test servers can be setup for automatic approval of content + scheduled publishing during no/less editorial activities.
Disclaimer: The code and/or the configurations posted are not official recommendations and should be used at sole's discretion with proper testing before deploying on live WebCenter Sites systems. Cheers!!
Thus, there is already an custom solution to:
1. Publish assets simultaneously to multiple destination. Furthermore, publishing to disaster recovery server can also be included.
2. Publish audit trails: Who published what and when
3. Minimize the effort of Contributors and Publishers
In one of my previous blog post - Automatic Approval of assets, I provided a glimpse on how to create a simple custom solution to automatically approve assets wherein administrators have control over setting up time when approval of content should occur which is similar as configuring scheduling publishing. With this approach:
1. Content is approved automatically to targeted destination
2. Admin has choice of selecting which content type (asset type) should be approved
3. Scheduling configuration just like scheduled publishing
4. If proper solution is developed, wherein administrators can easily disable/enable System Events, update asset types required for approval, destinations, scheduling, etc; automatic approval of assets can be helpful in various scenarios.
So, now which one to choose? Automatic approval or Multi-Target Publishing?
I have listed down few points which can help in deciding which mechanism will meet your requirements.
| Features | Multi-Target Publishing | Automatic Approval |
|---|---|---|
So there you have it, all pros and cons of both mechanisms. There is no preferred or superior option to other. One has to weigh both the options according to cache configurations, architecture and of course, customer requirements. Furthermore, both mechanisms can be mixed and used as needed. For e.g. Multi Realtime publishing can be configured for delivery servers whereas test servers can be setup for automatic approval of content + scheduled publishing during no/less editorial activities.
Disclaimer: The code and/or the configurations posted are not official recommendations and should be used at sole's discretion with proper testing before deploying on live WebCenter Sites systems. Cheers!!
Tuesday, April 12, 2016
Showing alert message to users
WebCenter Sites provides various customization hooks for customizing Contributor UI as mentioned in Developer's guide. But there is no illustration provided on showing custom message(s) to Contributor UI users either via simple alert or floating modal window.
When can custom messages be helpful?
Few use cases of showing custom message(s) which can be:
1. Showing welcome message
2. Showing message for changing password every 3 months
3. Showing message for upcoming event or scheduled maintenance period
As WebCenter Sites provides customizing Contributor UI via SiteConfigHtml element, it is very easy to create alert messages.
Simple welcome message can developed by creating CustomElements/UI/Config/SiteConfigHtml element using either Admin UI or Sites Explorer. Add the following code within SiteConfingHtml.jsp as shown below:
Now whenever any user logins to WebCenter Sites Contribution UI, welcome message is visible as shown below for fwadmin.
Above example is very simple one. In order to show message like scheduled maintenance, password change alert, deadline of a task to particular user or other important messages; one can simply make Ajax call to certain WebCenter Sites element and show corresponding results from the element in the alert message.
For e.g. Consider showing same welcome message via an element rather than defining within SiteConfigHtml.jsp.
1. Create a CSElement and add the code: Welcome <ics:getssvar name="username"/>! between opening and closing tag of <cs:ftcs>
2. Create a SiteEntry and associate the above CSElement (Wrapper=NO; pagelet=NO; uncached)
3. Make Ajax call from SiteConfigHtml.jsp to call the above SiteEntry and show the message only after Contributor UI is loaded. Add the following code within SiteConfigHtml.jsp:
Output should be same. Thus, it is very easy to create alert messages within Contributor UI which can be very useful sometimes when combined with other functionalities like system events, publishing, asset operations, etc.
Disclaimer: The code and/or the configurations posted are not official recommendations and should be used at sole's discretion with proper testing before deploying on live WebCenter Sites systems. Cheers!!
When can custom messages be helpful?
Few use cases of showing custom message(s) which can be:
1. Showing welcome message
2. Showing message for changing password every 3 months
3. Showing message for upcoming event or scheduled maintenance period
As WebCenter Sites provides customizing Contributor UI via SiteConfigHtml element, it is very easy to create alert messages.
Simple welcome message can developed by creating CustomElements/UI/Config/SiteConfigHtml element using either Admin UI or Sites Explorer. Add the following code within SiteConfingHtml.jsp as shown below:
Now whenever any user logins to WebCenter Sites Contribution UI, welcome message is visible as shown below for fwadmin.
 | ||||||||||
| Welcome message!! |
Above example is very simple one. In order to show message like scheduled maintenance, password change alert, deadline of a task to particular user or other important messages; one can simply make Ajax call to certain WebCenter Sites element and show corresponding results from the element in the alert message.
For e.g. Consider showing same welcome message via an element rather than defining within SiteConfigHtml.jsp.
1. Create a CSElement and add the code: Welcome <ics:getssvar name="username"/>! between opening and closing tag of <cs:ftcs>
2. Create a SiteEntry and associate the above CSElement (Wrapper=NO; pagelet=NO; uncached)
3. Make Ajax call from SiteConfigHtml.jsp to call the above SiteEntry and show the message only after Contributor UI is loaded. Add the following code within SiteConfigHtml.jsp:
Output should be same. Thus, it is very easy to create alert messages within Contributor UI which can be very useful sometimes when combined with other functionalities like system events, publishing, asset operations, etc.
Disclaimer: The code and/or the configurations posted are not official recommendations and should be used at sole's discretion with proper testing before deploying on live WebCenter Sites systems. Cheers!!
Tuesday, March 15, 2016
Deleting and regenerating cache
Caching is a very important aspect in Oracle WebCenter Sites and nearly all projects depend mostly on strong project design and optimal caching strategy (Note: Caching strategy also considers how your pages are coded). There is no use in going through various caching levels as they are aptly discussed in official document and in Oracle A-Team articles.
Before going through this post, I highly recommend to read about caching and different caches used within WebCenter Sites. This post is more helpful to those people who usually deal with resolving cache related issues.
What I want to highlight in this post is:
1. How to purge all cache?
2. How to re-generate all cache after all cache are purged?
One would ask why to delete all cache?
One of the important task while troubleshooting performance of a webpages is to calculate the number of cache objects generated, then by removing all the cache, hit a certain page(s) and find number of cache objects and dependencies generated for that/those page(s) using Support Tools or Admin UI. This task should generally carried out in Test environment or JSK. Thus, when it required to troubleshoot performance of webpages for full site(s), one can know by number of cache object generated for page(s) by flushing all the cache, make the changes within template or update cache settings and then re-generate all cache objects by hitting all the webpage urls.
How to purge all cache?
To purge all cache, one needs to know what kind of cache is enabled within your project i.e. incache (ehcache) or traditional cache (Only one of them is enabled). Incache is enabled by default within WebCenter Sites installation. Only old version of Oracle WebCenter Sites a.k.a FatWire 7.6 and before uses traditional cache but also has option to enable incache.
For deleting incache where WebCenter Sites is installed - Login to WebCenter Sites > Admin UI > Admin Tab > Expand System Tools Node > Cache Management > double click on Summary tab under CS Cache and Co-Res SS Cache separately. Select all checkboxs for flush cache and click "Flush Cache"
For deleting incache from Remote Satellite Server (RSS) - You can perform the same above step but using the following url:
http://[host]:[port]/[context]/Inventory?username=SatelliteServer&password=[password]
For deleting traditional cache, hit the following url:
http://[ip]:[port]/[context]/CacheServer?all=true&authusername=fwadmin&authpassword=[password]
One can use Support Tools to delete cache.
Furthermore, if you want to delete all incache forcefully, then you can find the location where cs-cache, ss-cache and linked-cache are stored from cs-cache.xml, ss-cache.xml and linked-cache.xml files respectively, which are located under [webapps]/cs/WEB-INF/classes folder and then delete everything under the respective folders. This task is to be performed after WebCenter Sites is shutdown.
How to re-generate all cache after all cache are purged?
Deleting cache is easy task but major problem is generating cache. A website can have hundreds to thousands of webpages and it is very arduous task to hit each webpage url one by one to generate cache. Also, WebCenter Sites does not provide any tool which can crawl through all the page urls. But there are various sites or tools available online which can do the task of crawling of all the webpages. One of the tools which I use and like is flem firefox add-on. It has ability to intake urls from clipboard memory and crawl through them as slideshow. It also has settings to set page load time interval and is very easy to use.
For using flex firefox add-on, basically one would need to first list down all webpage urls of site(s) and just copy & paste to flem add-on and run the slideshow.
If vanity url is configured for a site, then it is very easy to list all urls using the following query:
SELECT 'http://[ip]:[port]/[context]/' || webroot || '/' || webreferenceurl FROM WebReferences
Disclaimer: The code and/or the configurations posted are not official recommendations and should be used at sole's discretion with proper testing before deploying on live WebCenter Sites systems. Cheers!!
Saturday, March 5, 2016
Set vanity url for Touch devices
This post is about one of the solution to one of the bugs within Oracle WebCenter Sites 11g 11.1.1.8.0 (any patch): Vanity url generated for desktop does not work on mobile or tablets. Just ignore this post if you are not using WebCenter Sites 11g8 version and/or later.
Whats the issue about?
Suppose you created a site and have created/generated vanity url only for DESKTOP device group and did not bother to create any vanity url for TOUCH devices, then the vanity url which was generated for DESKTOP fails to work on mobile and tablets whereas they work as expected when browsed through desktops. Mobile devices shows long urls which are not at all desirable by any client.
Reason behind the issue?
This behavior is because WebCenter Sites adds one parameter - "d" whenever asset's link is generated via any tags or API and it's a product default behavior. For DESKTOP device group, d's value is null whereas for TOUCH device group, d's value is Touch. As any mobile or tablet receives request to load vanity url, WebCenter Sites set the d parameter to Touch and finds that there is no vanity url, thus, resulting in long non-desired url.
So, what can be done to resolve this? Are there any workaround solutions?
Yes, Oracle has already provided two workaround solutions.
In this post, I have discussed briefly on achieving one of the solution as quickly as possible if your client is in hurry to resolve it. One of the solutions recommended by Oracle is to generate vanity url for all the assets for TOUCH devices and pass the d parameter's value while generating hyperlinks for assets via <render:gettemplateurl> tag. By doing so, now as all your assets will have vanity url for TOUCH devices also, tag will generate correct vanity which will work for mobiles and tablets.
But the problem is: how to create/generate vanity url for so many assets and how to make sure that any new asset which will be created in future will have vanity url for both DESKTOP and TOUCH device group? One cannot just keep on adding vanity url by editing and saving assets for TOUCH device group as there can be very large number of assets.
Plausible solution:
I have thought of a few solutions which may work for many customers. So what can be done? One can think of creating asset listener which will generate vanity url on saving asset but problem of using asset listener is that the custom attributes are not available on event: NEW. This is described in one of my old post. Thus, adding asset listener cannot handle both issues if you are using some custom attribute as a part of vanity url for the asset but following solution can.
Following are 2 ways for generating vanity url for TOUCH device group:
- First thing is obvious, configure TOUCH device group for your site. For details, check the chapter: Mobility in developer's guide.
- Either write custom flex filter or call an element from POSTUPDATE which will generate vanity url for TOUCH device group for the asset.
- If you are calling an element from POSTUPDATE element, add the following code in the called element and update as required. Logic for generating vanity url using flex filter will remain same.
- Once you are ready with any one of the above, all the old assets are required to edit & saved so vanity url is generated; which can be done either via Support Tools or writing small utility element.
- For any new asset which would be created in future, flex filter or the element called from POSTUPDATE will take care of it automatically.
- Update your element/template which generates hyperlink by adding the d parameter in it. Note: d variable is already added to cache criteria so only those templates/elements are required to be updated where logic is present to generate hyperlinks for assets.
Other approaches:
- If client does not allows for editing & saving all old assets to generate vanity url due any reason for e.g. auditing tasks like capturing who created/updated/approved/published content and when etc., luckily there is solution for it. Create an utility element to generate vanity url directly by updating WebReferences table. WebReferences table holds all the information related to vanity url(s) of all assets. As old assets will have vanity urls, one can find the required params like template, wrapper, etc. from the table itself for DESKTOP device group (note: dgroup column's value will be null for DESKTOP devices) and set vanity urls for TOUCH device group by setting dgroup column's value as Touch. Then you can deploy your new flex filter or the element approach as discussed for new future assets. Very important: Don't forget to take backup of WebReferences table before updating it. Flush resultset cache of WebReferences table after updating it.
- By creating URL Assembler (old way of generating vanity url) can generate pretty urls if no vanity url is configured. Idea is to generate hyperlinks by assembler if d variable value is Touch else generate hyperlink as usual which would be vanity url. Although according to tag library, if vanity url is present then tag returns vanity url but if d parameter is passed with value "Touch" & no vanity url is configured for Touch device group, then assembler url is generated. This can be pretty quick and neat solution without touching any asset as it is a simple jar file deployed on server and only requires restart after deployment. Also update the logic in your element which generates hyperlink for assets.
- Although the following suggestion works, it is not good for SEO considering that Google ranks website on basis of mobile-friendliness also. But still if you want same url for Touch device group also as they are configured for Desktop group, then you can delete all device group except Desktop and restart WebCenter Sites. After doing so, desktop urls will work on mobile or tablet or other phones too.
Disclaimer: This post does not provides full implementation rather just an idea on how to develop such solution. Please note, the code and the configurations posted are not official recommendations and should be used at sole's discretion with proper testing before deploying on live WebCenter Sites systems. Cheers!!
Automatic approval of assets
Oracle WebCenter Sites allows to schedule a publishing event called as Scheduled Publishing so that content gets published to target system automatically, if approved. Furthermore, with respect to publishing, WebCenter Sites also provides custom hooks like publish event listener (for auditing purposes), writing custom transporter (multi-destination publishing), email on completion of content's life cycle via workflow step or condition, etc. But it lacks one very important feature i.e. automatic approval of content.
In nearly all enterprise-level Oracle WebCenter Sites projects, it is very common to have following architectural design:
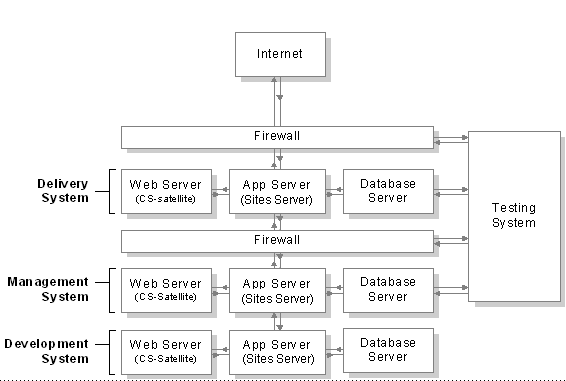
WebCenter Sites Systems
where each system has its own database, application server and web server (if applicable). One of the systems, Testing system, is an optional system usually installed for quality assurance. Content is synchronized between each system by means of Publishing (generally RealTime Publishing is used). But problem with having Test system is that authors/content editors do not usually approve and/or publish content from Management System but they want their content to be present in Testing System for testing site before go-live. And thus, this is where automatic approval of content can be very helpful for clients.
General steps:
1. Create one user with highest privileges on the source system (usually batchuser should be enough but having a separate user will not hurt). Although this is very easy task but needs to be taken care while creating such user as its credential should not be exposed to any other users who have access to Admin UI and/or Support Tools because these users can view/download the properties files and know password if not encrypted. To overcome this problem, use OOTB WebCenter Sites's utility program: PropertyEditor (both windows and unix version are available) which is shipped with WebCenter Sites; to save the password as encrypted (Check Sites Internal Security). Usually, it is better to create one site-specific/project-specific property file for e.g. [sitename/projectname]_Properties.ini file and add username & password. This property file should be placed in same folder where futuretense.ini file resides.
2. Write a custom utility which searches for held, new and edited assets which are required to be approved to target system. As it is considered that automatic publishing event is already set for publishing assets from source to target system, utility just needs to find and approve those assets. To implement this functionality, basic steps would be as followed:
3. Add an entry in SystemEvents table via Sites Explorer with following:
Summary:
In nearly all enterprise-level Oracle WebCenter Sites projects, it is very common to have following architectural design:
WebCenter Sites Systems
where each system has its own database, application server and web server (if applicable). One of the systems, Testing system, is an optional system usually installed for quality assurance. Content is synchronized between each system by means of Publishing (generally RealTime Publishing is used). But problem with having Test system is that authors/content editors do not usually approve and/or publish content from Management System but they want their content to be present in Testing System for testing site before go-live. And thus, this is where automatic approval of content can be very helpful for clients.
General steps:
1. Create one user with highest privileges on the source system (usually batchuser should be enough but having a separate user will not hurt). Although this is very easy task but needs to be taken care while creating such user as its credential should not be exposed to any other users who have access to Admin UI and/or Support Tools because these users can view/download the properties files and know password if not encrypted. To overcome this problem, use OOTB WebCenter Sites's utility program: PropertyEditor (both windows and unix version are available) which is shipped with WebCenter Sites; to save the password as encrypted (Check Sites Internal Security). Usually, it is better to create one site-specific/project-specific property file for e.g. [sitename/projectname]_Properties.ini file and add username & password. This property file should be placed in same folder where futuretense.ini file resides.
2. Write a custom utility which searches for held, new and edited assets which are required to be approved to target system. As it is considered that automatic publishing event is already set for publishing assets from source to target system, utility just needs to find and approve those assets. To implement this functionality, basic steps would be as followed:
- Create a CSElement from Admin UI or developer tools in Eclipse, say, for e.g. ApproveAssetsEvent
- Create a SiteEntry in SiteCatalog table using Sites Explorer (erstwhile Content Server Explorer) with same name i.e. ApproveAssetsEvent where sscache and cscache should be false. Important: Name should be same and should be created from Sites Explorer as there is one bug where in if SiteEntry is created from Admin UI, it fails to run the associated CSElement via System Events.
- Following sample code snippet should be helpful in writing this utility:
3. Add an entry in SystemEvents table via Sites Explorer with following:
- eventname: ApproveAssetsEvent
- type: 1
- enabled: 1 (1 for enabling and 0 for disabling)
- times: add time as mentioned in guide (Time format: hours:minutes:seconds weekdays/days of month/months of year)
- target: ContentServer
- params: pagename=ApproveAssetsEvent&target=12345 (where 12345 is Target System Id)
Summary:
- Create CSElement + SiteEntry or Template which lists the assets for approval and approves them for scheduled publishing.
- Add the entry in SystemEvents table using SitesExplorer.
- If there is too much activity on management system and depending upon how complex operations will take place in approve assets' element, custom event can be performance intensive and thus, it is better to schedule it when there is no or very less editorial activity. Usually scheduling to approve assets at the end of the day should be ideal time but obviously differs from project to project.
- Additionally one can off-load all events in SystemEvents table if you have clustered installation; by setting cs.eventhost to the cluster node which will act as event host and by setting cs.batchhost property which will act as batch host.
- Take care to set time of this custom approval event which doesn't clash with scheduled publishing event.
Subscribe to:
Posts (Atom)
A simple code compare functionality
One of the most important aspect of any development cycle is deployment and while deployment, it is very important to note the changes don...

-
 In Oracle WebCenter Sites 11.1.1.8.0 and above, it is very easy to generate vanity urls with help of webroots. With introduction of Vanity U...
 -
If you are using Engage, then is one caveat which needs to be taken care of: "Data in visitor's tables can increase exponentia...
-
There are times when we need to inspect all the fields of asset or either to perform other tasks. One can find all the details of any asset...